Step 1 : Create a database and secure the database using user id and password.
- Click on start -> click on Microsoft SQL server 2012 -> click on SQL Server Management Studio.

- Select SQL Server Authentication.

- Enter the Login and Password .
- Click on connect.

- Select Databases -> Right click on Databases ->click on New Database.

- Enter Database name.
- Click on ok.

- Expand Databases.

- Select Databases -> Right click on Databases -> click on refresh.

- Here we see our newly created Database.

- Expand our newly created Database.

- Expand tables.
- In tables, we have System tables and File tables only.

- To create security.
- Right click on security -> New -> Login.

- Enter Login name.
- Enter the password and confirm the password.

- Click on Server Roles .
- Select all Server Roles.

- Click on User Mapping.
- Select the Database , automatically User name will trigger.
- Select all Database role membership for : DB24.
- Click on Ok.

Step 2 : Create a repository in SAP Data Services Repository Manager.
- Click on start -> click on SAP Data Service 4.2 ->click on Data Service Repository Manager.

- Select Database type as Microsoft SQL Server.

- Enter Database Server name as GNS.
- Database name as DB23 (our newly created database in MSSQL).
- Enter User Name and Password which we entered in DB.
- Click on create.

- At below we see local Repository was successfully created.

- Select table ->click on refresh.

- Expand tables.
- Now we see lot of tables.

Step 3 :Create Job Server in Server Manager and associate job server to repository.
- It is used, when we want to create a table in SAP HANA. The Job server will pick the metadata from source created in SAP HANA from ECC to HANA
- Job server can be created using server Manager.
- Job server” Only used to transfer content”.
- Click on Start ->click on all programs -> click on SAP Data Services 4.2 ->click on Data Services server Manager.

- Click on configuration Editor.

- Here we can’t add job server. In order to create a job server, we need administrative privileges.
- We can’t able to do this step. Because, when we increase the number of Job servers running in the background. It degenerates system performance that’s why we limit to keep Job servers as minimal as possible.

- Here we took administrator user so we can able to do these steps.
- Click on Add.

- Enter Job Server name.
- Enter Job server Port between 3500-9999.

- Click on Add.

- In Database type, take Microsoft SQL Server.

- Enter database server name as GNS.
- Database name as DB23.

- Enter user name and Password as per entered DB creation.
- Click on apply.

- Click on ok.

- Here we see our Job server.

Step 4 : Register the job server in Central Management Console.
- For register our repository in Central Management Console (CMC).Go to CMC.
- Click on start -> click on computer.

- Click on c drive.

- Double click on shortcuts.

- Select our central management console.
- Right click on CMC -> click on properties.

- Right click on URL -> click on copy.

- Open Google chrome.

- Paste URL in Chrome.

- Enter the User Name and Password.

- Click on Data Service.

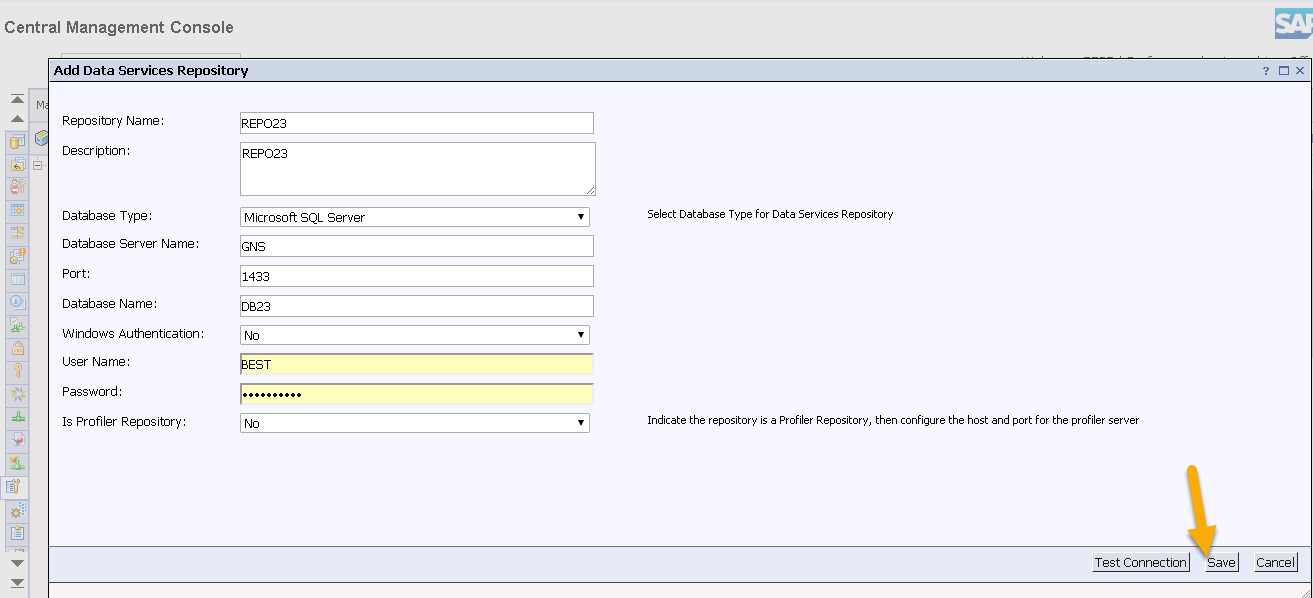
- Click on add Data service Repository.

- Enter Repository name as REPO23.
- Select Database Type as Microsoft SQL Server.
- Database server Name as GNS.
- Database Name as DB23.
- Enter user name and Password as per DB creation.
- Click on test connection.

- Here we see Repository connected successfully.
- Click on ok.

- Click on save.
No comments:
Post a Comment