- Description: Table Control generally used to display Multiple records in a single screen.
- The table control and tab strip controls structures are defined in the type group ‘CXTAB’.
- Step 1. Go to SE80 and Create a Module Pool Program , declare some variables and activate the program.
PROGRAM SAPMZTABLE_CONTROL.
TYPES : BEGIN OF TY_STR,
SEL .
INCLUDE STRUCTURE T001.
TYPES : END OF TY_STR.
DATA : LS TYPE TY_STR,
LTAB TYPE TABLE OF TY_STR.
TYPES : BEGIN OF TY_STR,
SEL .
INCLUDE STRUCTURE T001.
TYPES : END OF TY_STR.
DATA : LS TYPE TY_STR,
LTAB TYPE TABLE OF TY_STR.
CONTROLS : TBL_CTRL TYPE TABLEVIEW USING SCREEN 0001.
- Step 2. Create a screen ‘0001’.

- Step 3. Provide a short text and select Normal Screen Radio Button and then click on the Layout Button as shown.

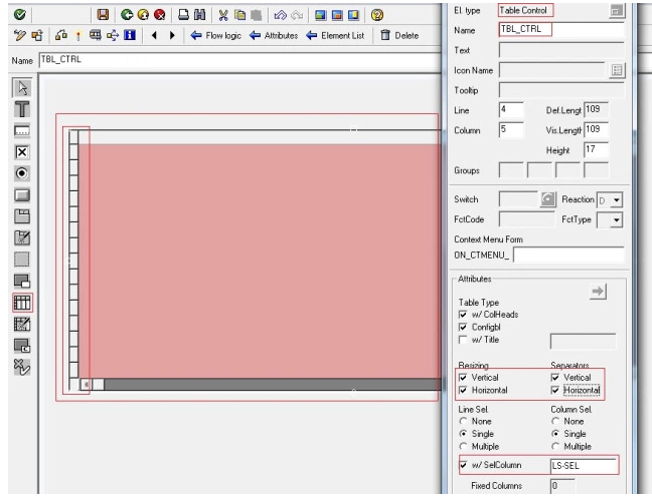
- Step 4. Select the Table Control Element from the left column of the screen painter, Drag and Drop it on the screen. Adjust the Height and Width as per required. Now Double click on it and provide the name of the table control as ‘TBL_CTRL’ as declared in the main program.
- Check the Vertical and Horizontal resizing button. Select the Horizontal and vertical separators. Select the w/SelColumn check box and Provide the name as LS-SEL. [LS- is declared as a work area in the main program]. This LS_SEL works as a select button for each row in the table control.
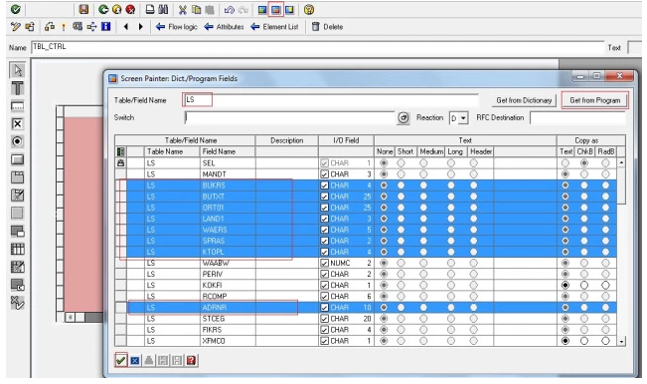
- Step 5. Click on the top button marked as red and in the pop up window provide the work area name as ‘LS’ and click on the Get from Program button. Select some fields that you want to show in the table control columns. At last click on the Continue button.
- Step 6. All the selected columns appear in the table control .

- Step 7. Now lets provide the column text to every column on the table control. Select the text box element from the element list, drag and drop it on the header of the table control. Double click on the text element and Provided the required column text as shown below.

- Step 8. Double click on the first column [LS-BUKRS]. As it is the primary key field of the table, lets make it as read only field. Set the property as ‘Output only’.

- Step 9. Provide the flow logic of the screen ‘0001’ containing the table control. Add the Loop and Endloop statement in the PBO and PAI of the screen which contains the table control. The Loop and Endloop statement in the PBO is used to read the value from the internal table and fill the table control through the work area. The Loop and Endloop statement in the PAI is used to process the record that are in the table control if the user performs some action like updating or modifying the existing records.
PROCESS BEFORE OUTPUT.
MODULE STATUS_0001.
LOOP AT LTAB INTO LS WITH CONTROL TBL_CTRL
CURSOR TBL_CTRL-CURRENT_LINE.
ENDLOOP.
PROCESS AFTER INPUT.
LOOP AT LTAB.
ENDLOOP.
MODULE USER_COMMAND_0001.
MODULE STATUS_0001.
LOOP AT LTAB INTO LS WITH CONTROL TBL_CTRL
CURSOR TBL_CTRL-CURRENT_LINE.
ENDLOOP.
PROCESS AFTER INPUT.
LOOP AT LTAB.
ENDLOOP.
MODULE USER_COMMAND_0001.
- Step 10. Define the modules in the flow logic of the screen and provide some code in it as shown below.
module STATUS_0001 output.
* SET PF-STATUS 'xxxxxxxx'.
* SET TITLEBAR 'xxx'.
select * from t001 into corresponding fields of table LTAB UP TO 100 ROWS.
endmodule. " STATUS_0001 OUTPUT
* SET PF-STATUS 'xxxxxxxx'.
* SET TITLEBAR 'xxx'.
select * from t001 into corresponding fields of table LTAB UP TO 100 ROWS.
endmodule. " STATUS_0001 OUTPUT
- Step 11. Lets create a T-Code for the Module pool program.

- Step 12. Run the program and the table control is displayed on the screen.

No comments:
Post a Comment