For example two clients in the same R/3 instance.
1. Client 800.
2. Client 810.
To transfer the data between two clients the table structures and their data types should be match.
In this example, Client 800 is Source system, and Client 810 is destination system.
In Client 800 I have created a customized table and inserted some records.
In Client 810 I have created only table.
Common Steps in Both Clients:
Creating the Logical System Names and Assigning to Clients:
Go to TCODE SALE.
IMG path IDoc Interface / Application Link Enabling (ALE) -> Basic Settings -> Logical Systems -> Define Logical System

Click on Display / Change Button.

Click on New Entries .

Specify the Logical System name and description.
Note: Logical System Naming convention is <SID>CLNT<NNN>

Click on Save and Back buttons
Now you will come back to the IMG path screen. Click on Assign Logical System to client.

Click on Display / Change Button

Click on New Entries

eCATT: The Extended Computer Aided Test Tool
eCATT: The Extended Computer Aided Test Tool is an automated testing tool that allows you to create automated functional test cases for the majority of applications running in SAP GUI for Windows/Java/HTML or Web Dynpro environments. Like other test tools, it works by making a recording of an application, which you can then parameterize and replay with differing sets of input values. You can test the behavior of the application by reading and testing the values returned by the application.
eCATT differs from external tools in that it provides full access to the application server and database layers of the system, allowing you to test function modules, BAPIs as well as Web Services, perform checks against the database, and interrogate or simulate changes to customizing settings
Go to TCODE SALE. Direct TCODE SM59.
IMG Path IDoc Interface / Application Link Enabling (ALE) -> Communication -> Create RFC Connections.

Click on Create button.

Specify all the details in RFC connection screen.

Click on Logon Security tab and specify the details.

Now click on Test Connection button.

It show the connection log in next screen.
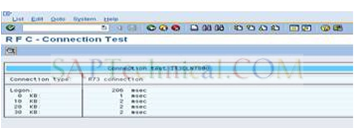
Click on Remote Logon Button

Depends upon your settings the destination client will open. If you check the Current user option under Logon/ Security tab, then it will show the screen directly without asking the user name and password details.

Creating RFC ports:
Go to TCODE WE21
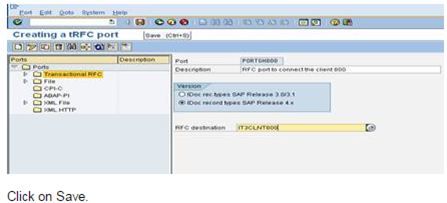
Select the Transactional RFC in left side tree and click on Create button

In dialog box you can select either Generate port name or own port name. If you select Generate Port name system will generate automatically. Here I selected Own port name. Click on continue.

Specify the description and RFC destination name.
Repeat the same above process in other client. By using opposite client instead of 800 specify 810.
In Client 800 steps:
Creating table structure:
Go to TCODE SE11.
Specify table name as ZSTUDENTS.
In Delivery and Maintenance tab set attributes as “Display Maintenance Allowed”
The table fields are

Creating IDOC Segments:
Go to TCODE WE31.
Specify a name and Click on Create Button.

Here specify all the ZSTUDENTS table fields and their types as shown below.

Click on SAVE button, then it will show dialog box with user name, press continue.

Specify your package name and click on save

Specify your request and press “Continue”.

Click on Back button, and then you will see the created segment.

Creating Basic IDOC Type:
Go to TCODE WE30
Specify a name to your IDOC and click on create button


Click on Edit menu -> Model View -> Create

Specify description of model view and technical name in dialog box and press continue.

Select your model view and click on Edit menu -> Add Message type

In dialog box specify the sender, receiver, message type and click on continue.

Now your Model View looks like

Click on Environment Menu -> Generate Partner profile

It will show the following screen, click on execute.

It will show the partner profile log in next screen

Click on Back button 2 times, it will take back to Distribution Model screen.

Click on Edit Menu -> Model View -> Distribute.

In displayed dialog box select the partner system and click continue

Then it will show the Log of Model View Distribution.

Click on Back button.
To check partner profile Go to TCODE WE20
In displayed screen select the partner system in left side tree under Partner Type LS.

Write a Report Program in SE38 to create IDOC control records and transfer it to destination partner system.
The following is the program to generate the IDOC control records and process it.
TABLES : ZSTUD_TAB.
DATA : S_CTRL_REC LIKE EDIDC, "IDOC CONTROL RECORD
S_ZSUSTUD LIKE ZSUSTUD. " CUSTOMER HEADER DATA
DATA: T_ZSTUD_TAB LIKE ZSTUD_TAB OCCURS 0 WITH HEADER LINE.
DATA :T_EDIDD LIKE EDIDD OCCURS 0 WITH HEADER LINE. " DATA RECORD
DATA: T_COMM_IDOC LIKE EDIDC OCCURS 0 WITH HEADER LINE. " GENERATED COMMUNICATION IDOC
CONSTANTS : C_ZSUSTUD LIKE EDIDD-SEGNAM VALUE 'ZSUSTUD'.
CONSTANTS : C_IDOCTP LIKE EDIDC-IDOCTP VALUE 'ZIDOCSU'.
***********SELECTION SCREEN**********************
SELECT-OPTIONS : S_STUDID FOR ZSTUD_TAB-STUDENTID OBLIGATORY.
PARAMETERS : C_MESTYP LIKE EDIDC-MESTYP DEFAULT 'ZSUMESS', "Message Type
C_RCVPRT LIKE EDIDC-RCVPRT DEFAULT 'LS', "Partner Type of Receiver
C_LOGSYS LIKE EDIDC-RCVPRN DEFAULT 'SUCLNT810', " Partner Number of Receiver
C_RCVPOR LIKE EDIDC-RCVPOR DEFAULT 'A000000066', "Receiver port
C_SNDPRN LIKE EDIDC-SNDPRN DEFAULT 'SUCLNT810', " Partner Number of Receiver
C_SNDPRT LIKE EDIDC-SNDPRT DEFAULT 'LS'. "Partner Type of SENDER
********************START-OF-SELECTION.
START-OF-SELECTION.
PERFORM GENERATE_DATA_RECORDS.
PERFORM GENERATE_CONTROL_RECORD.
PERFORM SEND_IDOC.
form GENERATE_DATA_RECORDS .
SELECT * FROM ZSTUD_TAB INTO TABLE T_ZSTUD_TAB WHERE STUDENTID IN S_STUDID .
IF SY-SUBRC NE 0.
MESSAGE 'RECORD NOT FOUND!' TYPE 'E'.
ENDIF.
PERFORM ARRANGE_DATA_RECORDS.
endform. " GENERATE_DATA_RECORDS
form GENERATE_CONTROL_RECORD .
S_CTRL_REC-RCVPOR = C_RCVPOR. "Receiver Port
S_CTRL_REC-MESTYP = C_MESTYP. "Message type
S_CTRL_REC-IDOCTP = C_IDOCTP. "Basic IDOC type
S_CTRL_REC-RCVPRT = C_RCVPRT. "Partner type of receiver
S_CTRL_REC-RCVPRN = C_LOGSYS. "Partner number of receiver
S_CTRL_REC-SNDPRT = C_SNDPRT. "Sender Partner type
S_CTRL_REC-SNDPRN = C_SNDPRN. "Sender Partner Number.
endform. " GENERATE_CONTROL_RECORD
form SEND_IDOC .
CALL FUNCTION 'MASTER_IDOC_DISTRIBUTE'
EXPORTING
master_idoc_control = S_CTRL_REC
* OBJ_TYPE = ''
* CHNUM = ''
tables
communication_idoc_control = T_COMM_IDOC
master_idoc_data = T_EDIDD
EXCEPTIONS
ERROR_IN_IDOC_CONTROL = 1
ERROR_WRITING_IDOC_STATUS = 2
ERROR_IN_IDOC_DATA = 3
SENDING_LOGICAL_SYSTEM_UNKNOWN = 4
OTHERS = 5
.
IF sy-subrc <> 0.
* Implement suitable error handling here
ELSE.
COMMIT WORK.
LOOP AT T_COMM_IDOC .
WRITE : / 'IDOC GENERATED -', T_COMM_IDOC-DOCNUM. " IDoc number
ENDLOOP.
ENDIF.
endform. " SEND_IDOC
form ARRANGE_DATA_RECORDS .
DATA : W_INDEX1 LIKE SY-TABIX,
W_INDFEX2 LIKE SY-TABIX.
SORT T_ZSTUD_TAB BY STUDENTID.
LOOP AT T_ZSTUD_TAB .
S_ZSUSTUD-STUDENTID = T_ZSTUD_TAB-STUDENTID. S_ZSUSTUD-STUNAME = T_ZSTUD_TAB-STUNAME. T_EDIDD-SEGNAM = C_ZSUSTUD. T_EDIDD-SDATA = S_ZSUSTUD .
APPEND T_EDIDD.
CLEAR T_EDIDD.
CLEAR T_ZSTUD_TAB.
ENDLOOP.
endform. " ARRANGE_DATA_RECORDS
Now execute the program, and specify the range of records to transfer


Go to TCODE WE02 to check the generated IDOC control records.
Click on Execute


In Client 810 Steps:
Function Module Creation:
Create a Function Module to update the table from the IDOC segments
Go to SE37
Specify a name and click on create.

In dialog box specify function group and description, and click on save.


Specify the Export parameters in Export tab

Specify the Table parameters in Tables tab


FUNCTION ZSHAN_IDOC_ZSHSTUD.
*"----------------------------------------------------------------------
*"*"Local Interface:
*" IMPORTING
*" REFERENCE(INPUT_METHOD) LIKE BDWFAP_PAR-INPUTMETHD
*" REFERENCE(MASS_PROCESSING) LIKE BDWFAP_PAR-MASS_PROC
*" EXPORTING
*" REFERENCE(WORKFLOW_RESULT) LIKE BDWF_PARAM-RESULT
*" REFERENCE(APPLICATION_VARIABLE) LIKE BDWF_PARAM-APPL_VAR
*" REFERENCE(IN_UPDATE_TASK) LIKE BDWFAP_PAR-CALLTRANS
*" TABLES
*" IDOC_CONTRL STRUCTURE EDIDC
*" IDOC_DATA STRUCTURE EDIDD
*" IDOC_STATUS STRUCTURE BDIDOCSTAT
*" RETURN_VARIABLES STRUCTURE BDWFRETVAR
*" SERIALIZATION_INFO STRUCTURE BDI_SER
*" EXCEPTIONS
*" WRONG_FUNCTION_CALLED
*"----------------------------------------------------------------------
** Include File containing ALE constants
INCLUDE MBDCONWF.
TABLES : ZSTUD_TAB.
DATA : W_ZSUSTUD LIKE ZSUSTUD.
DATA : T_ZSTUD_TAB LIKE ZSTUD_TAB OCCURS 0 WITH HEADER LINE.
WORKFLOW_RESULT = C_WF_RESULT_OK.
LOOP AT IDOC_CONTRL.
IF IDOC_CONTRL-MESTYP NE 'ZSHSTUDMT'.
RAISE WRONG_FUNCTION_CALLED.
ENDIF.
* Before reading a new entry, clear application buffer
LOOP AT IDOC_DATA WHERE DOCNUM EQ IDOC_CONTRL-DOCNUM.
W_ZSUSTUD = IDOC_DATA-SDATA.
MOVE-CORRESPONDING W_ZSUSTUD TO T_ZSTUD_TAB.
INSERT INTO ZSTUD_TAB VALUES T_ZSTUD_TAB.
ENDLOOP.
UPDATE ZSTUD_TAB FROM T_ZSTUD_TAB.
IF SY-SUBRC EQ 0.
IDOC_STATUS-DOCNUM = IDOC_CONTRL-DOCNUM.
IDOC_STATUS-STATUS = '53'.
IDOC_STATUS-MSGTY = 'I'.
IDOC_STATUS-MSGID = 'YM'.
IDOC_STATUS-MSGNO = '004'.
IDOC_STATUS-MSGV1 = T_ZSTUD_TAB-STUDENTID.
APPEND IDOC_STATUS.
CLEAR IDOC_STATUS.
ELSE.
IDOC_STATUS-DOCNUM = IDOC_CONTRL-DOCNUM.
IDOC_STATUS-STATUS = '51'.
IDOC_STATUS-MSGTY = 'E'.
IDOC_STATUS-MSGID = 'YM'.
IDOC_STATUS-MSGNO = '005'.
IDOC_STATUS-MSGV1 = T_ZSTUD_TAB-STUDENTID.
APPEND IDOC_STATUS.
CLEAR IDOC_STATUS.
WORKFLOW_RESULT = C_WF_RESULT_ERROR.
RETURN_VARIABLES-WF_PARAM = 'Error_Idocs'.
RETURN_VARIABLES-DOC_NUMBER = IDOC_CONTRL-DOCNUM.
APPEND RETURN_VARIABLES.
CLEAR RETURN_VARIABLES.
ENDIF.
ENDLOOP.
ENDFUNCTION.
Go to TCODE WE57
Click on Display / Change button.

Click on New Entries Button
Specify created FM name, Function Type, Basic Type (IDOC), Message Type, and Direction and click on SAVE button.

Define Input Method for Inbound Function Module:
Go to TCODE BD51
Click on Display / Change button
Click on New Entries
Specify FM name and Input Types as 2. And Click on Save and Back buttons.

Creating Process Code:
Go to TCODE WE42
Click on Display / Change Button
Click on New Entries button
Specify a process code name, Description and select the options processing with ALE services, Processing by Function Module.

In next screen select the FM name and click on SAVE button and Click on BACK button.

It will take to you previous screen. Double Click on Logical Message in left side tree.


Click on New Entries button

Specify the Message Type and Click on Save button

Generating the Partner Profile:
Go to TCODE BD64.
Select the Model View which you distributed in client 800.

Click on Environment Menu -> Generate Partner Profile
It will show the next screen, in that click on Execute button
It will show the Partner Profile details
To check the partner profile details.
Go to TCODE WE20. Select the partner system name.

Test
Transferring the IDOC control records from Client 800 to 810:
In source system, go to TCODE SE38. (In client 800)
Execute the Report program which you created.
Check in Destination System: (Here client 810)
Go to TCODE WE02

Check in ZSTUDENTS table in SE11.

This comment has been removed by the author.
ReplyDeleteBhutani City Center 150 is a premier industrial development positioned in Noida, India. This challenge capabilities office spaces, retail outlets, and enjoyment zones. Designed to cater to agencies and consumers, it boasts trendy infrastructure, green areas, and connectivity to important shipping hubs, making it a high destination for work and leisure.
ReplyDelete